Sunday, October 31, 2010

Paper Craft Class at the Y


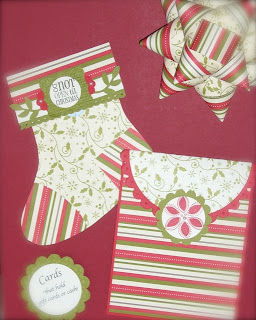
My next Paper Craft Class at the Benton Harbor/St. Joseph Y starts this Thursday, 10-11am! In this class we will be making mostly Christmas goodies with a couple Thanksgiving crafts the first couple weeks of November. If you need inspiration for holiday cards, cookie boxes & homemade gifts, this class is for you!

Holiday Punch Art

Christmas Scrapbook page or frame for Christmas art!

Christmas Cards

Cookie boxes and treat holders!
Fun stocking stuffers, table favors or hostess gifts!

Gift cards holders and decorative paper bows!

Saturday, October 9, 2010

Mini Halloween Treat Boxes

Use Stampin' Up!'s Petal Card Extra Large Double Punch
to create these mini treat boxes. They are small, each one holds only one of those chocolate nuggets, but so fun to make!

So, I was trying to give credit to the creator of these awesome little boxes. I first saw them on Stampin' Up!'s Stampin Connection, by Karen Leveille who said she "cased" them from Patti Lee. And holy moly mini boxes, wow! When I finally tracked them down on Patti's totally awesome website, well wow! Check this out and this and THESE! Theses mini boxes aren't the only awesome paper crafts on her website- go check it out, I promise you'll find something you LOVE!

Posted by Picasa

Day of Gratitude


Did any of my reader know that October 2nd was World Card Making Day? I shoulda, coulda had something fun at my house for WCMD but I didn't :( I did however create a few cards that day but didn't have too much free time. I followed World Card Making Day - Release Week Challenges from Verve Stamps. They always have really cute card sketches and even cuter examples to go with them. On all the cards I used the stamp set, Day of Gratitude. Love this stamp set and I can't get enough of the Autumn Spice DSP from the holiday mini. This is great cardstock! Plus I just love the cardstock colors that match; cajun craze, old olive, more mustard & early espresso!

It's not too late to make some great Thanksgiving cards!
Posted by Picasa

Saturday, September 18, 2010

Fall Pumpkin Box

This pumpkin box is so fun and really pretty easy to make!
All you really need is the 2" x 1 3/8" Oval Extra Large Punch.
Start by punching 6 ovals from Pumpkin Pie cardstock. To add a bit of dimension, use sponge pumpkin pie ink around the edges of all ovals. Make the front and back pumpkin panels by placing two ovals side-by-side. Adhere a third oval directly on top in the middle. Repeat for the back panel.
To create the box, start with a 4" square of pumpkin pie cardstock. Score one way at 1" & 3". Turn cardstock and score at 1 1/2" & 2 1/2". Crease the scored lines and then cut along the 1" score lines up to the crease. (There are 4- (1") "lines" that should be cut.) Fold up and adhere ends to make box.
Adhere the box to one of the pumpkin panels. Cut off the bottom edge so it is level with the bottom of box. Repeat on the other side.
Adhere a handle to the box. You can either cut a strip of old olive cardstock (approx. 1/2" x 5 1/2") or you can use the Dotted Scallop Ribbon Border punchto create a handle (as shown in photo). Create a stem and leaf out of old olive cardstock and adhere to box. Finish off by securing a Glimmer Brad.
Add candy and give to someone special!!
Posted by Picasa

Here is a video tutorial of another fun pumpkin using a smaller oval punch.
And check out this adorable pumpkin patch using the Round Tab punch!
Here is another pumpkin basket tutorial.

Halloween Characters & Cards

These fun halloween characters have toothpicks in them so you could fancy up your halloween cupcakes or other food items at your party. Instead of toothpicks you could always add a magnet to decorate your fridge or a paper clip to add them to a goodie bag, etc.!

Just love this card probably because of that stinkin' owl!! If you don't have this punch yet, you should!! :) Also on this card is the new Spider Web Embossing folder and the adorable Glimmer Brads!
This photo doesn't do justice to how fun the "Wicked Cool" Stamp set really is! I have seen so many cute ideas with the legs/shoe image! This is also my first card that I tried what I will call "ribbon ruffling".

For more cute cards with the "Wicked Cool" stamp set click here, here and wow! here! And then check out this super fun card!

This card uses my most favorite Embossing Folder, Vintage Wallpaper! I end up using this one all the time for all different kinds of cards! Also on this card, I used my other favorite halloween stamp set, "Halloween Hoot"!
Posted by Picasa

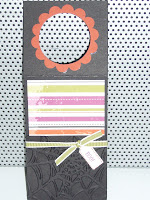
Halloween Water Bottle Tag Directions

All materials & supplies are Stampin' Up!
Start with a 2 1/4" x 7 3/4" piece of cardstock. Score 2" from each end.

Emboss one end with the Spider Web Embossing Folder (this end gets folded up. The other end is folded down) Cut a 2" square of Wicked Fun Specialty DSP and adhere near the left score line. (as shown above)

Take a piece of 1/8" taffeta old olive ribbon, put a bit of Snail Adhesive in the middle and secure on the back of tag a bit shy of the middle. Bring the ribbon ends around to the front and tie a knot. This will keep the pocket closed.

Use the 1 3/8" circle punch and the 1 3/4" scallop circle punch
to make the opening ring for the tag.

First punch the circle out of Cajun Craze cardstock. Then, holding the scallop punch upside down, punch out the scallop around the circle. (see photo!)

Adhere the scallop ring on the top portion of tag and use
the circle punch to re-cut the circle for the opening.

Ta-da! Use the Tiny Tags stamp set and the Tag punch to create the "Boo!" tag. Adhere tag with a glue dot under the ribbon knot. Add a packet of drink mix, hang on a bottle of water and enjoy!

Note: To add a snack size candy bar like Hershey's or Kitkat, add a 1/4" score line to accommodate the bulkiness. So you would score 2" at one end & then 2" AND 2 1/4" at the other end.
Posted by Picasa

Vintage Label Card Camp


Here are the cards we made for the "Vintage Label" Card Camp. The cards on the left are using the Vintage Label stamp set. The cards on the right were improvised. I wanted you to see that, even without the Vintage Label stamp set, you can still make some great cards! I left them blank so any sentiment can be added. Thank you to all the ladies that came to the camp! I always have fun getting ready for these and enjoy seeing you all concentrating so hard on figuring out the cards! :) Great job ladies! And thank you Ruth for the great banana bread!